Focus Flow
When you first fire up Minecraft with MovieFocus and all its prerequisites installed, you see ... nothing. You might get a bit lost at the sight of the whole emptiness which awaits you, but don't worry, this guide will show you how to activate manual focusing and see what's actually going on.
Using manual focusing requires you to select one of the supported shaderpacks. If you haven't done that yet, please do it now. In case you're not sure whether your shaderpack is supported or not, just continue on. We'll test that together.
Understanding the Focus Flow
MovieFocus only registers a single key which does does different things depending on what the state of the program is. That magical key is called the "Focus Flow Key", and by default, it is set to F. You can press it to open the focus flow menu:
![]()
What you see now is nothing more than an empty screen, but it's more than that. Let's just click on each one of the encircled + buttons at the bottom and see what happens:
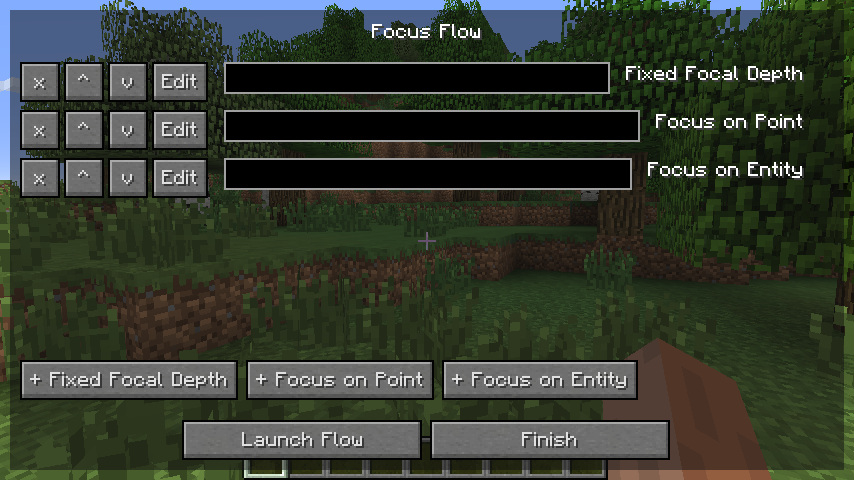
Our focus flow list has suddenly filled up with three entries. But what does it mean? What are these focus flow entries useful for?
To understand that, we must first take a leap and think about what happens when we actually record a shot. Say we want to first focus on our protagonist, but then, he walks out of the room. What do we do? Well, every sensible cinematographer would probably search another person or object to focus on, i.e. the actor that speaks next. So we need to have a way to define a flow of different focus configurations that are executed after each other throughout the shot. The focus flow list does exactly that. It allows you to put different focus configurations like focus on Carol and focus on this plant into an order and execute them after each other later on. Make sure you understand this concept of the focus flow, since it's gonna be vital all throughout the rest of this guide.
Back to the focus flow GUI screen. The + buttons at the bottom add new focus flow entries with an according focus configuration to the list, i.e. Focus on Entity. In the list itself, each line contains buttons to move the entry up, move it down, or delete it. The Edit button allows you to — as you might guess — edit the entry, but we'll come back to that later. Then there's a text field which you can use to title entry so that you will recognize it later on. Finally, the label at the right side shows you what kind of focus configuration the entry implements.
Editing Entries
Let's now go about editing focus flow entries. When you first create an entry, it is setup with some default settings that depend on the type of focus configuration you have selected. But those default settings are rarely useful for what you're trying to accomplish, so you need to change them. To enter the edit screen, just click on the obvious Edit button in the focus flow list:

A new screen opens up, the focus flow entry screen:
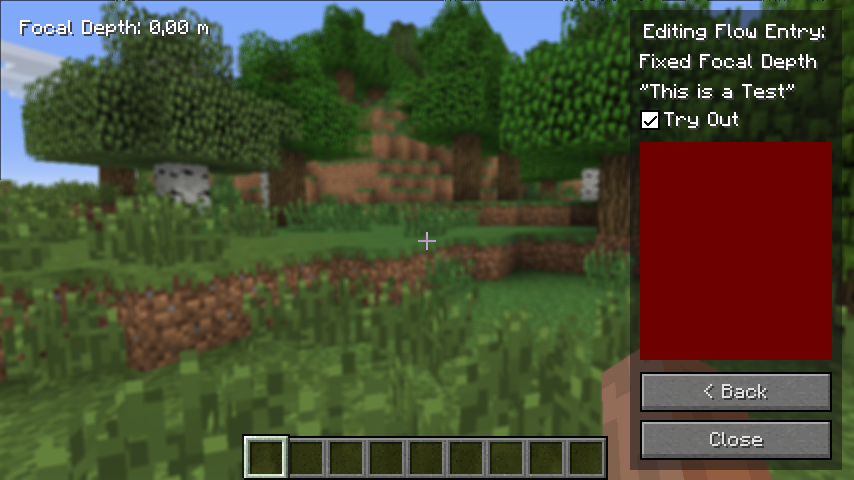
And suddenly, everything turns blurry. That's because when you edit a focus flow entry, it is automatically activated. In the top left corner, you can see that current calculated focal depth, and since it's zero, you're practically focusing on the camera itself and nothing else. If the screen didn't turn blurry at this point, your selected shaderpack is probably not supported. Please try one of the ones which are listed here.
Let's take a look at the GUI. Notice the red block at the right. Normally, that's the place where the configuration-specific settings are displayed, but it's censored for now because we want to look at the general functionality of the screen first.
The back button at the bottom just leads back to the focus flow list screen, the close button closes the GUI entirely and let's you play the game again (you can also press ESC for that). At the top, you can see the type of focus configuration you're editing (Fixed Focal Depth, in this case) and the title you gave it. Most importantly, the Try Out checkbox is responsible for activating the edited focus flow entry. When you disable it, the screen therefore turns clear again instantly:

Note that any changes that you make in the focus settings screen are immediately applied without you having to click anything. That way, you can create your focus setup in a very quick and fluid way.
Well enough, now you know how to edit focus flow entries in general. But as of yet, you have no idea how each of the different types of focus configurations works. Please refer to the page about focus configurations for further information.
Launching the Focus Flow
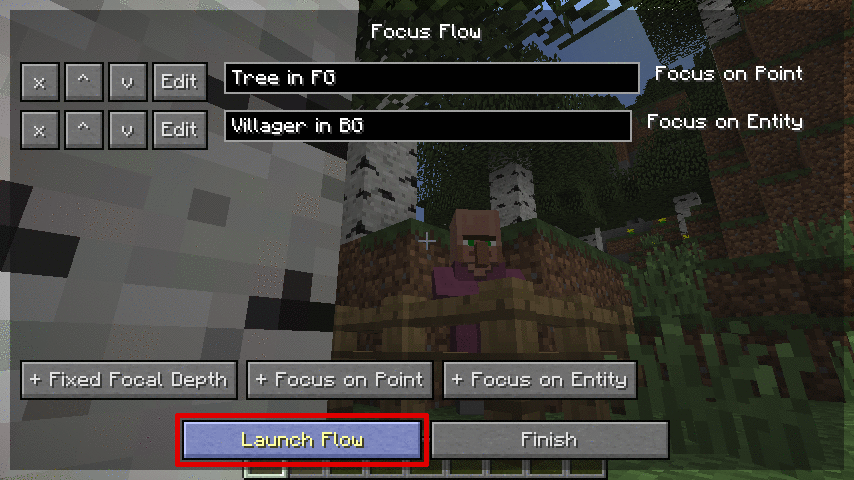
Say you have finished configuring all your focus flow entries for your next scene. Now you, of course, want to run it and capture some amazing footage using your custom focusing setup.
Have you noticed the big button which says Launch Flow? Yeah, it does exactly what you think it does.
Once in the flow, the HUD in the top left corner displays some information, including the current focal depth. That value tells you the distance at which objects must lie relative to the camera plane so that they are perfectly sharp. The distance is given in meters, which is equal to Minecraft blocks.
Moreover, the HUD shows the name and title of the focus configuration which is producing the focal depth, and some hints how to use the focus flow. You can press your flow key (F by default) to advance to the next focus flow entry; pressing F1 hides the entire GUI and HUD so that you can really focus on your action. Let's start flowing and recording!